Python SDK
Python SDK reference for the Infrared City simulation platform — wind, solar, thermal comfort, area analyses, buildings, vegetation, ground materials, and webhook-driven async jobs.
🧪 Notebooks + agent skills · 📊 Knowledge base
Notebooks for all 9 analyses, agent skills (Claude Code / Cursor / Codex / Copilot / Windsurf), and runnable Python recipes live at Infrared-city/infrared-skills.
Features:
- 9 analysis types: wind speed, pedestrian wind comfort, daylight availability, direct sun hours, sky view factors, solar radiation, thermal comfort (UTCI), thermal comfort statistics, and interior daylight factor
- Interior daylight on explicit room geometry — walls, openings and floor slabs, per building / floor / surface / sensor point (see Interior Daylight Factor)
- Facade, roof & BYO-sensor analysis on building surfaces (solar-family models), plus terrain draping (solar-family + thermal comfort)
- Area API for multi-tile polygon analysis with automatic tiling, merging, and clipping
- Buildings API for 3D building data retrieval
- Vegetation API for tree data retrieval
- Ground Materials API for surface material layers
- Weather data integration
- Async job submission with webhook notifications and persistable schedules
- Fully typed (PEP 561)
Installation
pip install infrared-sdkOr with uv:
uv add infrared-sdkOptional — faster tile decode. Install the [fast] extra to enable orjson-backed JSON parsing (~2.2× faster for large tile payloads):
pip install infrared-sdk[fast]
# or: uv add "infrared-sdk[fast]"
Requirements: Python 3.9+ (tested on 3.9 – 3.13; the 3.9 floor supports embedded environments like Rhino 8 / Grasshopper, Houdini 19, Maya 2024, QGIS LTS). Dependencies (requests, pydantic, validators, numpy) are installed automatically. orjson is an optional dependency installed only with [fast].
After installation the infrared console script is available on your PATH. Running it (or python -m infrared_sdk) prints a version banner — useful for confirming the install and active version:
infrared
# or
python -m infrared_sdk
In non-TTY environments (CI, piped output) and when NO_COLOR=1 or INFRARED_QUIET=1 is set, the banner drops its ANSI colour codes but still prints. INFRARED_QUIET=1 silences the runtime [INFO]/[WARN] diagnostics, not this banner — see Configuration.
Quick Start
from infrared_sdk import InfraredClient
from infrared_sdk.analyses.types import WindModelRequest, AnalysesName

polygon = {
    "type": "Polygon",
    "coordinates": [[
        [11.570, 48.195], [11.580, 48.195],
        [11.580, 48.201], [11.570, 48.201],
        [11.570, 48.195],
    ]],
}

# api_key and base_url fall back to INFRARED_API_KEY / INFRARED_BASE_URL env vars
with InfraredClient() as client:
    # 1. Fetch buildings for the area
    area = client.buildings.get_area(polygon)

    # 2. Run a wind analysis over the polygon
    result = client.run_area_and_wait(
        WindModelRequest(
            analysis_type=AnalysesName.wind_speed,
            wind_speed=15,
            wind_direction=180,
        ),
        polygon,
        buildings=area.buildings,
    )

    # 3. Result contains a merged grid covering the polygon
print(f"Grid shape: {result.grid_shape}")Before You Write Code
Everything in this list returns a plausible number with a 200, not an error. Nothing here raises, several are billed, and a reviewer reading your output cannot tell.
| Assumption that is wrong | What you get instead of an error |
|---|---|
| My polygon's CRS gets checked | It does not. A projected or [lat, lon] polygon that still lands inside [-180,180] × [-90,90] runs, on the wrong patch of the planet. → Coordinate Systems |
| Metres are metres | There are two metre frames. buildings / context_geometry / ground_geometry passed to run_area* are polygon-bbox-SW; per-tile payloads and sensor_points are tile-local. Mixing them offsets the scene by a tile, silently. → Coordinate Systems |
min_legend / max_legend give me a colour scale | They are None on every area run, so the familiar ... if not None else np.nanmin(grid) guard takes the fallback every time and auto-scales each plot to its own data. Populated on surface results only. → AreaResult |
| A missing cell reads as 0 | Masked cells are None — map to NaN before any mean. Separately, a surface at exactly 0.0 is real data: party walls and light wells can be 32 % of facades on a dense block. Two different things. → Facade, Roof & Terrain Analysis |
| Omitting terrain gives me flat ground on purpose | It gives you a flat plane at z = 0 and a result that looks entirely normal. There is no terrain client — ground_geometry is bring-your-own, every time. → Terrain draping |
I can check terrain_alignment by comparing means | The scene mean barely moves while individual surfaces are rewritten: +0.03 kWh/m² mean while 44 % of facades moved by more than 1, individual surfaces spanning −48.8 to +85.6. Compare distributions. → terrain_alignment |
| Distant hills still shade my site | Not since 0.5.1 — terrain is sliced per tile. Pass relief you care about as context_geometry. → Facade, Roof & Terrain Analysis |
| One mesh shape for the whole payload | Interior entities are nested; ground_geometry and vegetation are flat. The wrong shape is not a server error — the entity is skipped and you get a plausible field over an empty occluder. → Interior Daylight Factor |
| Extra interior selectors are ignored harmlessly | The server dispatches on the first key present and drops the rest: a one-storey request billed as every storey of every building. → Interior Daylight Factor |
opening_factor is the same as openingFactor | Only the exact camelCase key is read, with no alias. The near-miss is ignored and the window silently becomes clear glass. → Interior Daylight Factor |
| A sensor below 2 % DF is under-lit | Every sensor carries a constant ~2 % internally-reflected floor — the same number as the "daylit" convention, so a per-sensor test against 2 % does not discriminate. Read changes above the floor. → Interior Daylight Factor |
preview_area(polygon) prices my run | Without analysis_type it prices the wind grid: ~4× the tiles for a solar or thermal run (36 vs 9). It warns; the number is still wrong. → Cost preview |
| A big facade request is one job | Over the 262,144-sensor cap it is split transparently into sub-jobs, and each sub-job is billed separately. → Batching & billing |
Recommended Reading Path
If you are new to the SDK, read in this order:
- Examples — runnable demos in the public Infrared-city/infrared-skills repo.
- Output Reference — what each analysis produces, in what units, and how to read the numbers.
- Coordinate Systems — the four frames, and what a mix-up looks like when nothing errors.
- Analysis Types — pick the analysis you need and copy the snippet.
- Area API → How tiling works — only if your polygon is larger than ~512 m on a side; otherwise tiling is automatic and you can skip it.
Examples
Jupyter notebooks
Fourteen notebooks under cookbook/notebooks/ run end-to-end against the live API. Every one is executed against each SDK release before it ships.
00_quickstart | first analysis, start here |
01_buildings | fetching and supplying building geometry |
02_vegetation_and_ground | trees and ground materials as layers |
03_weather_and_time_periods | weather files, TimePeriod, multi-month and annual windows |
04_tiling_and_area_api | how tiling, merging and clipping actually work |
05_analysis_types_tour | one polygon, every area analysis, side by side |
06_image_rendering | server-rendered PNGs with the canonical palette |
07_async_and_webhooks | submit now, collect later, webhook delivery |
08_wind_merge_strategies | wind tile seams and directional_blend |
09_error_handling_and_tuning | typed errors, retries, resuming a schedule |
10_real_world_map_overlay | georeferenced overlay on a basemap |
11_facade_and_terrain | facade and roof sensors, terrain draping |
12_surface_results_rendering | rendering surface results onto geometry |
13_interior_daylight_factor | interior daylight on explicit room geometry |
If a result looks wrong rather than reads wrong, check the scale, masking and colormap before debugging the model — see the rendering recipe.
Scripts
Runnable script demos live in the public Infrared-city/infrared-skills repo under cookbook/scripts/, ordered by learning path:
demo_wind_analysis.py— quickstart: single wind analysis with Plotly heatmapdemo_vienna.py— the eight area analyses over one polygon, multi-panel visualizationdemo_utci_analysis.py— end-to-end UTCI thermal comfort with buildings, weather, vegetation, and ground materialsdemo_vegetation_ground.py— fetch-once-reuse pattern across multiple analysis runsdemo_fetch_layers.py— fetch buildings, vegetation, and ground materials and plot the layers (no analysis)demo_tiling.py— educational walkthrough of the tiling internalsdemo_advanced_usage.py— low-level primitives, custom polling, BYO weather data, persist/resume schedulesareas_demo_async/— async area analysis with webhook notifications
Output Reference
Every analysis run over a polygon returns an AreaResult with a 2-D merged_grid (numpy array, ~1 m per cell) covering it. Cells outside the polygon are NaN. The table below lists what each cell value means. The exception is daylight-factor, which is not an area model: it takes explicit room geometry and returns per-sensor values, with no polygon and no grid.
| Analysis | Cell unit | Typical range | Physical meaning |
|---|---|---|---|
| Wind Speed | m/s | 0–20 | Steady-state wind magnitude near pedestrian level for one (speed, direction) pair |
| Pedestrian Wind Comfort | comfort class (int 0–4) | Lawson criteria | Categorical comfort/safety class per chosen criterion (e.g. Lawson LDDC: A/B/C/D/E from sit-long to unsafe) |
| Daylight Availability | hours | 0–100 | Hours of usable daylight at the cell over the chosen TimePeriod |
| Direct Sun Hours | hours | 0–(period length) | Cumulative hours of direct sun over the chosen TimePeriod |
| Sky View Factors | fraction | 0–100 | Portion of the sky hemisphere visible from the cell (1 = fully open, 0 = fully obstructed) |
| Solar Radiation | kWh/m² | 0–~hundreds | Cumulative solar irradiance on the ground over the TimePeriod |
| Thermal Comfort (UTCI) | °C (UTCI equivalent) | Range based on weather data provided | Felt temperature combining air temperature, mean radiant temperature, humidity, and wind |
| Thermal Comfort Statistics | % time | 0–(period length) | Time spent in the chosen band: thermal_comfort, heat_stress, or cold_stress |
| Interior Daylight Factor | % of outdoor illuminance | legend 0–100 | Per sensor, not per cell — indoor illuminance as a share of the unobstructed outdoor value under a CIE overcast sky. See Interior Daylight Factor |
Configuration
| Environment Variable | Description | Default |
|---|---|---|
INFRARED_API_KEY | Your Infrared API key | — |
INFRARED_BASE_URL | API base URL | https://api.infrared.city/v2 |
INFRARED_BIG_PAYLOADS_ENABLED | Kill switch for the auto-switching $ref envelope path. Set to false to force every POST to take the inline path. | true |
INFRARED_BIG_PAYLOADS_THRESHOLD_BYTES | Strict greater-than threshold (raw json.dumps bytes) above which large POST bodies are zipped, uploaded to S3, and replaced with a {"$ref": ...} envelope. | 5242880 (5 MiB) |
INFRARED_SDK_DEBUG | Set to 1 to add verbose [DEBUG] [SDK:…] diagnostics on top of the always-on [INFO]/[WARN] progress lines. | unset |
INFRARED_QUIET | Set to 1 to silence the runtime [INFO]/[WARN] diagnostic lines (as of 0.4.12) and the one-time client-instantiation hint; errors still print. Does not silence the python -m infrared_sdk CLI banner. | unset |
The API key and base URL can also be passed directly to the constructor (the big-payload env vars don't have constructor equivalents — they're tuning knobs read at call time):
# Explicit — pass credentials directly
client = InfraredClient(api_key="your-key", base_url="https://api.infrared.city/v2")

# Env vars — set INFRARED_API_KEY (and optionally INFRARED_BASE_URL), then:
client = InfraredClient()
InfraredClient supports the context manager protocol (with statement) for automatic cleanup of HTTP sessions. You can also call client.close() manually.
Geometry Format
All analysis payloads accept a geometries parameter — a dict mapping building identifiers (strings) to DotBim mesh objects:
geometries = {
    "building-001": {
        "mesh_id": 0,
        "coordinates": [x1, y1, z1, x2, y2, z2, ...],  # flat [x, y, z, ...] array in meters
        "indices": [0, 1, 2, 3, 4, 5, ...]              # triangle index array (REQUIRED)
    },
    "building-002": {
        "mesh_id": 1,
        "coordinates": [x1, y1, z1, x2, y2, z2, ...],
        "indices": [0, 1, 2, ...]
    },
}
Each mesh entry follows the special DotBim format:
| Field | Type | Description |
|---|---|---|
mesh_id | int | Numeric mesh identifier |
coordinates | list[float] | Flat [x, y, z, ...] vertex array. Coordinates are in meters, relative to the polygon bounding-box south-west corner (see DotBim coordinate system) |
indices | list[int] or None | Triangle index array (3 indices per face). Optional |
You can load geometries from a file or pass the buildings dict returned by the Buildings API:
# Option A: Load from a file
import json
with open("scene.json") as f:
    geometries = json.load(f)

# Option B: Use buildings from the area API
area = client.buildings.get_area(polygon)
geometries = area.buildings  # dict already in the right format
When using run_area_and_wait(), pass buildings separately via the buildings parameter rather than setting geometries on the payload. The SDK handles per-tile coordinate transforms and building assignment automatically.
Optional vegetation and ground_materials can also be fetched and passed to run_area_and_wait(). See Vegetation & Ground Materials for details.
Buildings
DotBim coordinate system
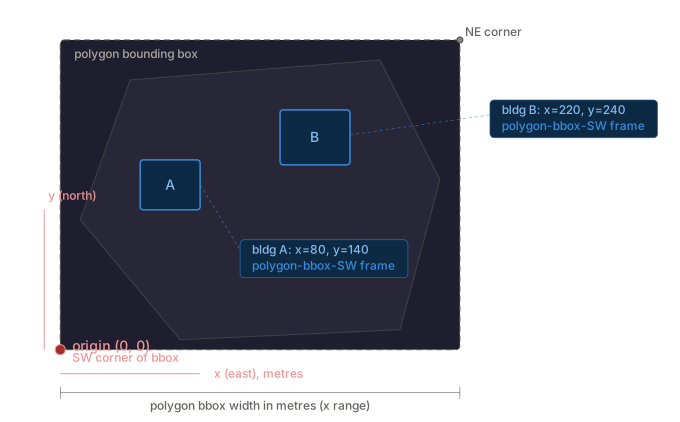
Building coordinates use a local meter-space system: x-axis points east, y-axis points north, z is height.
get_area(polygon) fetches buildings from multiple tiles, deduplicates them, and transforms all coordinates so the origin is the polygon bounding-box SW corner — all buildings share one frame regardless of which tile they came from.
When you pass buildings to run_area_and_wait(), the SDK automatically transforms them from the polygon-bbox-SW frame to each tile's local frame. Coordinate Systems below maps every frame the SDK uses and which call converts between them; Building coordinate transforms in the Area API section has the per-tile mechanics.
Check dotbimpy for more information on the dotbim file format.
Building retrieval
Fetch 3D building data for a polygon with automatic deduplication across tiles:
area = client.buildings.get_area(polygon)
print(area.total_buildings)
print(area.buildings)  # dict[str, DotBimMesh]
Coordinate Systems
Four frames: degrees in, two metre frames in the middle, a UV frame out. Nothing in the API errors when you supply the wrong one — the geometry lands somewhere else and the run succeeds.
| Frame | Units and origin | What lives in it |
|---|---|---|
| WGS84 lon/lat | degrees, [lon, lat] (RFC 7946) | the polygon argument; vegetation and ground_materials features |
| Polygon-bbox-SW metres | SW corner of the polygon's bounding box = (0, 0); +x east, +y north, z up | buildings, context_geometry, ground_geometry as passed to run_area() / run_area_and_wait(); what get_area() returns |
| Tile-local metres | SW corner of that tile's inference square = (0, 0); same axes | payload.geometries on a single-tile analyses.execute(); sensor_points / sensor_normals; interior-model geometry |
| Surface UV | per-surface origin + u_axis / v_axis, in tile metres | SurfaceAnalysisResult.surfaces — output only, never an input |
Input CRS — getting to WGS84
The SDK takes WGS84 lon/lat and does not negotiate CRS, reproject, or warn on plausibility. validate_polygon() checks structure and that coordinates fall inside [-180, 180] × [-90, 90]; it cannot check the CRS. A UTM easting of 4_500_000 is rejected on range, but an easting of 400_000 is read as a longitude in West Africa and runs.
One line prevents it:
import geopandas as gpd
from shapely.geometry import mapping

gdf = gpd.read_file("aoi.gpkg", layer="study_area")
gdf_4326 = gdf.to_crs("EPSG:4326")          # <- this one
polygon = mapping(gdf_4326.geometry.iloc[0])
When you go through pyproj directly, always pass always_xy=True — without it Transformer returns (lat, lon) for EPSG:4326 and a handful of others.
The full recipe set — GeoPandas / shapely, bbox and extent, GeoTIFF bounds via rasterio, BIM and IFC site anchoring, UTM auto-select for your own metric work, and a ten-line preflight that catches lat/lon swaps and out-of-envelope polygons — is in geospatial-crs.md in the skills repo.
The two metre frames — who converts, and when
client.buildings.get_area(polygon)fetches per tile, deduplicates, and returns everything in polygon-bbox-SW — one frame for the whole area, whichever tile a building came from.run_area()/run_area_and_wait()do the polygon-bbox-SW → tile-local step for you, per tile, onbuildings,context_geometryandground_geometry. You never write this transform. The mechanics are in Building coordinate transforms.client.analyses.execute()does not. It is a single-tile primitive, sopayload.geometriesandsensor_pointsare read as already tile-local.
The split: through run_area* you speak polygon-bbox-SW; through the job primitives you speak tile-local. Mixing them — building a payload by hand from area.buildings and posting it through analyses.execute() — offsets the entire scene by that tile's position within the polygon. Request and result both look normal.
Vertical datum
z is metres up, and it is relative — the SDK asserts no geoid, no ellipsoid, no vertical EPSG. Only the internal agreement between your terrain and your buildings matters.
client.buildings.get_area() returns every building based at exactly z = 0. They carry height, not elevation, so pairing them with a DEM in orthometric or ellipsoidal heights leaves the two disagreeing by the site elevation — a few hundred metres across most of Europe. terrain_alignment decides the outcome: "auto-align" (the default) re-bases each solid onto the terrain beneath it and absorbs the mismatch silently, which is why fetched buildings plus an absolute DEM appear to "just work"; "assume-aligned" moves nothing and makes any base outside a ±1 m band a 422 for the whole job.
With no ground_geometry the setting is inert and you get a flat plane at z = 0 — not an error, and a result that looks entirely normal.
Surface UV frames
Each SurfaceSensorGrid carries origin, u_axis and v_axis in tile metres, and the frame is right-handed: the outward normal is u_axis × v_axis, in that order. The server builds it as u = ẑ × n, v = n × u, so outward-wound shells — everything client.buildings returns — give outward-pointing normals. Because the frame is +x east and +y north, the compass bearing follows directly; the code is under Which way does a surface face?, and cell-centre maths and cell_tris are in notebook 12_surface_results_rendering.
"My geometry is in the wrong place"
Nothing below raises. Work down the table.
| Symptom | Likely frame error |
|---|---|
| Result is over open water, farmland, or another country | Polygon is not WGS84, or is [lat, lon] |
| Everything mirrored about the diagonal | [lat, lon] swap — or pyproj without always_xy=True |
| Buildings offset by a whole multiple of 512 m (256 m on wind) | Polygon-bbox-SW geometry posted straight to analyses.execute(), which expects tile-local |
| Only the SW tile looks right; the others are bare | Same cause, seen across a multi-tile run |
| Trees or ground materials nowhere near the site | Metre vertices passed where lon/lat was expected |
| Site unexpectedly bright; distant blocks cast no shadow | Negative-coordinate buildings filtered out, or an occluder simply beyond the 128 m tile context |
| Buildings float above or sink into the terrain | ground_geometry on an absolute vertical datum against z = 0 buildings |
| Terrain shading vanished after upgrading to 0.5.1 | Terrain is now sliced per tile — pass distant relief as context_geometry |
| Heatmap overlay squashed toward the SW | Placed with polygon.bounds instead of result.bounds, which is NE-padded to the grid |
| Exported GeoTIFF upside down | SDK row 0 is south, GeoTIFF row 0 is north — np.flipud |
Time Period
Solar, thermal, and wind-comfort analyses require a TimePeriod to define the time window for the simulation. The time period also determines which weather data points are included when filtering from a weather file.
from infrared_sdk.models import TimePeriod

tp = TimePeriod(
    start_month=6, start_day=1, start_hour=9,
    end_month=8, end_day=31, end_hour=17,
)| Field | Type | Range | Description |
|---|---|---|---|
start_month | int | 1-12 | Start month |
start_day | int | 1-31 | Start day |
start_hour | int | 0-23 | Start hour |
end_month | int | 1-12 | End month |
end_day | int | 1-31 | End day |
end_hour | int | 0-23 | End hour |
All 6 fields are required.
day values are validated against the calendar month: April 31, February 30, June 31, September 31, and November 31 raise ValidationError. February 29 is accepted — TimePeriod carries no year context. The window must move forward (end > start); year-wrap windows such as Nov→Feb are not supported, so split them into two periods.
How TimePeriod affects weather data
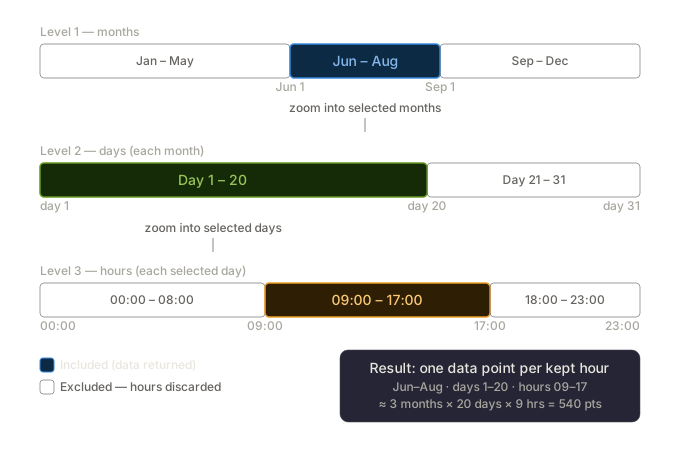
TimePeriod defines a recurring time window applied across every year in your weather file. It works as a three-level cascade filter:
- Months — only data from
start_monththroughend_monthis considered. - Days — within each of those months, only days from
start_daythroughend_dayare kept. - Hours — within each of those days, only hours from
start_hourthroughend_hourare kept.
Every hourly data point that does not fall inside all three windows is discarded. The diagram below illustrates how TimePeriod(start_month=6, start_day=1, start_hour=9, end_month=8, end_day=20, end_hour=17) filters the data.
Result: ~3 months × 20 days × 9 hours = 540 hourly data points per year in the weather file.
Which analyses need a TimePeriod
| Analysis | TimePeriod | Weather Data |
|---|---|---|
| Wind Speed | No | No |
| Sky View Factors | No | No |
| Daylight Availability | Yes | No |
| Direct Sun Hours | Yes | No |
| Solar Radiation | Yes | Yes (radiation arrays) |
| Thermal Comfort (UTCI) | Yes | Yes (temperature, radiation, humidity, wind) |
| Thermal Comfort Statistics | Yes | Yes (same as UTCI) |
| Pedestrian Wind Comfort | Yes (for weather filtering) | Yes (wind speed/direction arrays) |
Weather Data
Search for nearby weather stations and filter data by time range:
from infrared_sdk.models import TimePeriod

# Find weather stations near a location (radius in km)
locations = client.weather.get_weather_file_from_location(
    lat=48.1983, lon=11.575, radius=50
)
# Returns a list of station dicts:
# [
#     {
#         "uuid": "eb91892c-fbe3-4743-ade5-c22cfb5913e1",
#         "fileName": "DEU_BY_Munich-Theresienwiese.108650_TMYx",
#         "location_data": {
#             "city": "Munich-Theresienwiese", "state": "BY", "country": "DEU",
#             "latitude": 48.1632, "longitude": 11.5429, "elevation": 520.0,
#             "time_zone": 1.0, "station_id": "108650", "source": "SRC-TMYx",
#             "type": "Location",
#         },
#     },
#     ...
# ]

# Use the station's uuid to filter weather data by time range. The
# `identifier` parameter on filter_weather_data is the station uuid.
weather_data = client.weather.filter_weather_data(
    identifier=locations[0]["uuid"],
    time_period=TimePeriod(
        start_month=6, start_day=1, start_hour=9,
        end_month=6, end_day=30, end_hour=17,
    ),
)
# Returns a list[WeatherDataPoint], one per matching hour:
# [
#     WeatherDataPoint(dryBulbTemperature=22.3, windSpeed=3.2, windDirection=180.0,
#                      diffuseHorizontalRadiation=120.0, directNormalRadiation=450.0, ...),
#     WeatherDataPoint(dryBulbTemperature=23.1, windSpeed=4.1, windDirection=195.0, ...),
#     ...
# ]
Extracting fields for analysis payloads
Use extract_weather_fields to convert WeatherDataPoint lists into the flat arrays that analysis payloads expect. Field names are passed in camelCase (matching WeatherDataPoint attributes); the returned dict uses snake_case keys:
from infrared_sdk.models import extract_weather_fields

wind_fields = extract_weather_fields(weather_data, ["windSpeed", "windDirection"])
# Returns: {"wind_speed": [3.2, 4.1, ...], "wind_direction": [180, 195, ...]}Analyses that require weather data (Solar Radiation, UTCI, TCS, PWC) use the from_weatherfile_payload() class method, which extracts the required weather arrays from the data points and constructs the full request automatically.
Analysis Types
All analysis types follow the same pattern: construct a request, call client.run_area_and_wait() with a polygon and buildings, get an AreaResult.
The AreaResult contains a merged_grid (numpy array), min_legend / max_legend for color scale bounds, and metadata about succeeded/failed tiles. See AreaResult for the full schema.
Wind Speed
Simulates the steady-state wind field around buildings for a single inflow condition. Output cells are wind magnitude in m/s near pedestrian height.
| Parameter | Type | Range | Description |
|---|---|---|---|
wind_speed | float | 0-100 | Inflow wind speed (m/s). Fractional values are simulated as given, so do not round an EPW-derived mean such as 3.9. 0 is a valid calm-wind baseline. |
wind_direction | int | 0-360 | Inflow direction (degrees, meteorological convention: 0 = wind from north). Whole degrees only: the model truncates a fractional bearing, so the SDK rejects one rather than shifting your input. |
from infrared_sdk.analyses.types import WindModelRequest, AnalysesName

payload = WindModelRequest(
    analysis_type=AnalysesName.wind_speed,
    wind_speed=15,
    wind_direction=180,
)
result = client.run_area_and_wait(payload, polygon, buildings=area.buildings)
Pedestrian Wind Comfort (PWC)
Wind comfort classification using standard criteria. Requires wind speed and direction arrays from weather data.
| Parameter | Type | Description |
|---|---|---|
criteria | PwcCriteria | Classification standard (see below) |
wind_speed | list[float] | Wind speed time series from weather data |
wind_direction | list[float] | Wind direction time series from weather data |
Available criteria: vdi_3787 (also exposed as vdi_387, an alias kept for older code), lawson_1970, lawson_2001, lawson_lddc, davenport, nen_8100_comfort, nen_8100_safety
from infrared_sdk.analyses.types import PwcModelRequest, PwcCriteria, AnalysesName
from infrared_sdk.models import TimePeriod, extract_weather_fields

weather_data = client.weather.filter_weather_data(
    identifier="your-weather-file-id",
    time_period=TimePeriod(
        start_month=6, start_day=1, start_hour=9,
        end_month=6, end_day=30, end_hour=17,
    ),
)
wind_fields = extract_weather_fields(weather_data, ["windSpeed", "windDirection"])

payload = PwcModelRequest(
    analysis_type=AnalysesName.pedestrian_wind_comfort,
    criteria=PwcCriteria.lawson_2001,
    **wind_fields,
)
result = client.run_area_and_wait(payload, polygon, buildings=area.buildings)
Daylight Availability
Simulates daylight availability at a location over a time period.
| Parameter | Type | Range | Description |
|---|---|---|---|
latitude | float | -90 to 90 | Location latitude |
longitude | float | -180 to 180 | Location longitude |
time_period | TimePeriod | — | Analysis time window |
from infrared_sdk.analyses.types import SolarModelRequest, AnalysesName
from infrared_sdk.models import TimePeriod

payload = SolarModelRequest(
    analysis_type=AnalysesName.daylight_availability,
    latitude=48.1983,
    longitude=11.575,
    time_period=TimePeriod(
        start_month=6, start_day=1, start_hour=9,
        end_month=6, end_day=30, end_hour=17,
    ),
)
result = client.run_area_and_wait(payload, polygon, buildings=area.buildings)
Direct Sun Hours
Simulates direct sun hours. Same parameters as Daylight Availability.
payload = SolarModelRequest(
    analysis_type=AnalysesName.direct_sun_hours,
    latitude=48.1983,
    longitude=11.575,
    time_period=TimePeriod(
        start_month=6, start_day=1, start_hour=9,
        end_month=6, end_day=30, end_hour=17,
    ),
)
result = client.run_area_and_wait(payload, polygon, buildings=area.buildings)
Sky View Factors (SVF)
Calculates sky view factors. Geometry-only — no time period or weather data needed.
| Parameter | Type | Range | Description |
|---|---|---|---|
latitude | float | -90 to 90 | Optional. Tile-centroid latitude used by the vegetation validator. SVF inference itself does not read it. |
longitude | float | -180 to 180 | Optional. Tile-centroid longitude used by the vegetation validator. SVF inference itself does not read it. |
from infrared_sdk.analyses.types import SvfModelRequest, AnalysesName

payload = SvfModelRequest(
    analysis_type=AnalysesName.sky_view_factors,
    latitude=48.1983,    # optional — only needed if you inject vegetation
    longitude=11.575,    # optional — only needed if you inject vegetation
)
result = client.run_area_and_wait(payload, polygon, buildings=area.buildings)
Solar Radiation
Simulates solar radiation. Requires weather data arrays for diffuse horizontal and direct normal radiation.
from infrared_sdk.analyses.types import (
    SolarRadiationModelRequest, BaseAnalysisPayload, AnalysesName,
)
from infrared_sdk.models import TimePeriod, Location

tp = TimePeriod(
    start_month=6, start_day=1, start_hour=9,
    end_month=6, end_day=30, end_hour=17,
)

weather_data = client.weather.filter_weather_data(
    identifier="your-weather-file-id",
    time_period=tp,
)

payload = SolarRadiationModelRequest.from_weatherfile_payload(
    payload=BaseAnalysisPayload(
        analysis_type=AnalysesName.solar_radiation,
    ),
    location=Location(latitude=48.1983, longitude=11.575),
    time_period=tp,
    weather_data=weather_data,
)
result = client.run_area_and_wait(payload, polygon, buildings=area.buildings)
Solar radiation on facades, over terrain
The factory does not carry the surface/terrain fields — BaseAnalysisPayload rejects them (extra_forbidden), so they cannot be passed the way the snippet above passes analysis_type. Build the weather payload first, then add the geometry fields with model_copy.
terrain_mesh below is yours to supply — the SDK has no terrain client and will not fetch a DEM. See Building the terrain mesh for terrain_mesh_from_grid, which produces it from an elevation array:
terrain_mesh = terrain_mesh_from_grid(elevation, step=10.0)   # your DEM

payload = SolarRadiationModelRequest.from_weatherfile_payload(
    payload=BaseAnalysisPayload(analysis_type=AnalysesName.solar_radiation),
    location=Location(latitude=48.1983, longitude=11.575),
    time_period=tp,
    weather_data=weather_data,
).model_copy(update={
    "analysis_surfaces": "facades",        # or "roofs" / "all"
    "surface_grid_size": 1.0,
    "ground_geometry": {"terrain": terrain_mesh},
    "terrain_alignment": "auto-align",
})

result = client.run_area_and_wait(
    payload, polygon, buildings=area.buildings,
    terrain_context_margin_m=512.0,        # only if distant relief shades the site
)
# analysis_surfaces set -> SurfaceAnalysisResult, not a grid
Constructing SolarRadiationModelRequest(...) directly works too, but then you supply latitude, longitude, time_period, diffuse_horizontal_radiation and direct_normal_radiation yourself. The factory derives those from a weather file — prefer it, and layer the geometry on top.
Thermal Comfort Index (UTCI)
Calculates the Universal Thermal Climate Index. Requires filtered weather data.
from infrared_sdk.analyses.types import UtciModelRequest, UtciModelBaseRequest, AnalysesName
from infrared_sdk.models import TimePeriod, Location

tp = TimePeriod(
    start_month=6, start_day=1, start_hour=9,
    end_month=6, end_day=30, end_hour=17,
)

weather_data = client.weather.filter_weather_data(
    identifier="your-weather-file-id",
    time_period=tp,
)

payload = UtciModelRequest.from_weatherfile_payload(
    payload=UtciModelBaseRequest(
        analysis_type=AnalysesName.thermal_comfort_index,
    ),
    location=Location(latitude=48.1983, longitude=11.575),
    time_period=tp,
    weather_data=weather_data,
)
result = client.run_area_and_wait(payload, polygon, buildings=area.buildings)
Thermal Comfort Statistics (TCS)
Aggregated thermal comfort over a time period. Three subtypes: thermal_comfort, heat_stress, cold_stress.
from infrared_sdk.analyses.types import TcsModelBaseRequest, TcsModelRequest, TcsSubtype, AnalysesName
from infrared_sdk.models import TimePeriod, Location

tp = TimePeriod(
    start_month=6, start_day=1, start_hour=9,
    end_month=6, end_day=30, end_hour=17,
)

weather_data = client.weather.filter_weather_data(
    identifier="your-weather-file-id",
    time_period=tp,
)

payload = TcsModelRequest.from_weatherfile_payload(
    payload=TcsModelBaseRequest(
        analysis_type=AnalysesName.thermal_comfort_statistics,
        subtype=TcsSubtype.heat_stress,
    ),
    location=Location(latitude=48.1983, longitude=11.575),
    time_period=tp,
    weather_data=weather_data,
)
result = client.run_area_and_wait(payload, polygon, buildings=area.buildings)
Facade, Roof & Terrain Analysis
Analyse building surfaces (facades, roofs) or arbitrary sensor points instead of the default 512×512 m ground grid, and drape results over terrain geometry. Requires infrared-sdk >= 0.4.12.
Facade / roof / BYO-sensor fields work on the four raytraced solar-family models only: sky-view-factors, solar-radiation, direct-sun-hours, daylight-availability. Terrain fields additionally work on thermal-comfort-index and thermal-comfort-statistics.
Synthesised surface sensors — pass analysis_surfaces to put a sensor grid on every facade and/or roof. This flips the result type from a grid AreaResult to a SurfaceAnalysisResult:
from infrared_sdk import InfraredClient, SurfaceAnalysisResult
from infrared_sdk.analyses.types import SvfModelRequest, AnalysesName

payload = SvfModelRequest(
    analysis_type=AnalysesName.sky_view_factors,
    analysis_surfaces="facades",   # "facades" | "roofs" | "all"
    surface_grid_size=1.0,         # sensor spacing on each surface, metres (>= 0.25)
    surface_offset=0.0,            # optional: push sensors off the surface, metres (>= 0)
)
result = client.run_area_and_wait(payload, polygon, buildings=area.buildings)
assert isinstance(result, SurfaceAnalysisResult)
Terrain draping — supply ground_geometry (a {id: mesh} map of DotBim-style meshes) so results follow real elevation instead of a flat plane. Works on all six raytraced models, including UTCI / TCS.
Building the terrain mesh
One flat mesh per entry, the same shape as buildings — not the nested interior-entity shape:
{"terrain": {"coordinates": [x0, y0, z0, x1, y1, z1, ...],   # flat triples
             "indices":     [i0, i1, i2, ...]}}              # flat triangles
Coordinates are metres in the polygon-bbox-SW frame: the same frame area.buildings comes back in, origin at the south-west corner of the polygon's bounding box, +x east, +y north, z elevation on the same datum as the building meshes. A wrong frame does not fail the run — the terrain sits somewhere else, and auto-align seats every building onto whatever happens to be under it.
terrain_mesh_from_grid below turns any (ny, nx) elevation array into that shape. Triangles are wound counter-clockwise seen from above:
import numpy as np

def terrain_mesh_from_grid(elevation, x0=0.0, y0=0.0, step=10.0):
    """Triangulate a (ny, nx) elevation array into one flat SDK mesh.

    elevation[j, i] is the height in metres at (x0 + i*step, y0 + j*step),
    in the polygon-bbox-SW frame that `area.buildings` uses.
    """
    elevation = np.asarray(elevation, dtype=float)
    ny, nx = elevation.shape
    gx, gy = np.meshgrid(x0 + step * np.arange(nx), y0 + step * np.arange(ny))
    coords = np.stack([gx, gy, elevation], axis=-1).reshape(-1, 3)

    i, j = np.meshgrid(np.arange(nx - 1), np.arange(ny - 1))
    a = (j * nx + i).ravel()
    b, c, d = a + 1, a + nx, a + nx + 1
    tris = np.concatenate([np.stack([a, b, d], 1), np.stack([a, d, c], 1)])
    return {"coordinates": coords.ravel().tolist(),
            "indices": tris.ravel().tolist()}


# Stand in for your DEM: a 400 x 400 m patch at 10 m, with an 18 m rise.
# Replace `elevation` with your own array — nothing else changes.
nx = ny = 41
step = 10.0
gx, gy = np.meshgrid(np.arange(nx) * step, np.arange(ny) * step)
cx = cy = 0.5 * (nx - 1) * step
elevation = 18.0 * np.exp(-(((gx - cx) ** 2 + (gy - cy) ** 2) / (2 * 90.0 ** 2)))

payload = SvfModelRequest(
    analysis_type=AnalysesName.sky_view_factors,
    analysis_surfaces="facades",
    surface_grid_size=2.0,
    ground_geometry={"terrain": terrain_mesh_from_grid(elevation, step=step)},
    terrain_alignment="auto-align",   # see below
)
result = client.run_area_and_wait(payload, polygon, buildings=area.buildings)
Getting the array. A GeoTIFF DEM read with rasterio is the usual source: rasterio.open(path).read(1) gives you the array, and rasterio.warp.reproject resamples it onto the metre grid above. rasterio is not an SDK dependency — install it yourself, and check the reprojection, since that is where the frame is set. Whatever the source, the array must be in metres on the polygon-bbox-SW frame and must cover the whole polygon. Objects beyond the terrain's extent are clamped to the edge height rather than refused.
terrain_alignment — how your geometry meets the ground
Buildings, context_geometry and vegetation arrive with their own z values; terrain arrives with its own surface. terrain_alignment decides what happens when the two disagree.
| Mode | What the server does |
|---|---|
"auto-align" (default) | Seats the scene. Every solid in geometries, context_geometry and vegetation is re-based to local grade before inference: each base vertex is dropped to the terrain height beneath it, with a 0.5 m skirt so the footprint stays sealed on a slope. The seated geometry feeds the grid drape, the under-building mask, the occluder union and facade synthesis. |
"assume-aligned" | Validates only, moves nothing. Any object whose base sits outside a ±1 m band around the terrain is a 422 for the whole job, naming the first five offenders with their residuals. Use it when your geometry is already prepped against this DEM and you want a mismatch to be loud. |
With no ground_geometry the setting is inert and the payload is untouched.
terrain_context_margin_m (on run_area / run_area_and_wait) widens how far ground_geometry is sliced beyond each tile, in metres:
result = client.run_area_and_wait(
    payload, polygon, buildings=area.buildings,
    terrain_context_margin_m=512.0,   # default: seat-only reach
)
Values below the tile config's own context margin are floored to it (128 m on the solar family, 0 m on wind), so a building or tree can never be stranded on absent ground: run_area(..., terrain_context_margin_m=0) on a solar grid reads back 128.0. Payload grows roughly with the square of the reach.
AreaSchedule.terrain_context_margin_m records the reach actually used, and a retry_from that resolves to a different reach is refused — mixing them would merge two terrain extents into one result. Schedules written before 0.5.1 record nothing and never trip the guard.
Occluders — context_geometry (same {id: mesh} shape) adds shading geometry that is not itself analysed. accuracy ("standard" / "precision") selects finer raytracing on direct-sun-hours / daylight-availability only. Supply context_geometry and ground_geometry in the same polygon-bbox-SW frame as buildings; on multi-tile runs the SDK transforms them into each tile's local frame automatically (see the version note above).
Bring your own sensors — sensor_points (mutually exclusive with analysis_surfaces) computes at exact points instead of synthesising a surface grid. This is single-tile only: submit through the job primitives, not run_area_and_wait (which raises ValueError because the flat per-sensor response can't be tile-merged):
payload = SvfModelRequest(
    analysis_type=AnalysesName.sky_view_factors,
    geometries=area.buildings,
    sensor_points=[[105.0, 99.9, 1.5], [105.0, 99.9, 4.5]],   # tile-local metres
    sensor_normals=[[0.0, -1.0, 0.0], [0.0, -1.0, 0.0]],      # optional, non-zero, same length
)
job = client.analyses.execute(payload=payload)
completed = client.jobs.wait_for_completion(job.job_id, timeout=120)
raw = client.jobs.decompress(client.jobs.download_results(completed.job_id).content)
raw["output"]   # flat per-sensor list, one value per sensor in input order
An analysis_surfaces request returns a SurfaceAnalysisResult (there is no merged_grid):
| Field | Type | Description |
|---|---|---|
surfaces | dict | {"<building-id>/<surface-index>": SurfaceSensorGrid}. Each grid has origin / u_axis / v_axis (UV frame in tile metres), nu × nv, values, mean, peak, area, cell_area, cell_tris. Per-cell lists carry None for masked cells outside the surface footprint — map to NaN before numeric work, never 0. Helpers: .grid() (NaN-filled (nv, nu) array), .triangles() (exact clipped cell geometry). |
aggregates | dict | {"buildings": {building_id: BuildingAggregate}} with area / mean / peak — ready for element-level colouring. |
sensor_count | int | Total synthesised sensors. |
min_legend / max_legend | float | Value bounds across all surfaces. Populated on surface results — unlike area results, where they are None. |
emit_cell_tris — set False on the payload to drop cell_tris / cell_area from the response when you are texture-mapping and do not need the clipped per-cell geometry. On a large facade run those triangle arrays dominate the download, which dominates wall-clock. Both keys are then absent (not empty), so check for the key rather than assuming it is there.
Other rules: analysis_surfaces and sensor_points are mutually exclusive (raises ValidationError client-side); sensor_points cap is 100,000 entries; sensor_normals must match its length with non-zero entries; surface_grid_size >= 0.25, surface_offset >= 0. A terrain-only request (no facade / sensor fields) still returns a normal grid AreaResult.
Interior Daylight Factor
daylight-factor measures light inside a room: the illuminance at each sensor as a percentage of the unobstructed outdoor horizontal illuminance under a CIE standard overcast sky (10,000 lux). It is time-independent — an overcast sky carries no sun position — so it takes no TimePeriod and no weather data. Requires infrared-sdk >= 0.5.1.
Entity shape. The outdoor models take flat meshes; interior entities are nested:
{"geometry": {"payload": {"coordinates": [...], "indices": [...]}}}   // interior entity
{"coordinates": [...], "indices": [...]}                             // outdoor mesh
Passing the flat shape is not a server error. The entity reads as having no geometry and is skipped, so the analysis runs against an empty occluder and returns a near-uniform, physically meaningless field with a 200 — on a job you were billed for. to_interior_entity() (one mesh) and interior_entities() (a whole map) do the conversion; both accept a flat dict, a DotBimMesh, or an already-nested entity, so they are safe to call on anything:
from infrared_sdk import interior_entities, to_interior_entity

wall = to_interior_entity(flat_mesh)                          # -> nested entity
slab = to_interior_entity(flat_mesh, category="floor")        # + identity position/rotation
glass = to_interior_entity(flat_mesh, opening_factor=0.7)     # -> emits "openingFactor"

area = client.buildings.get_area(polygon)
context = interior_entities(area) # neighbours as occluders; get_area returns FLAT meshesThe four tiers. How you say where to measure selects a tier. The server dispatches on the first key present, in this order:
sensor_points → sensor_surfaces → buildings → floors
| Tier | You supply | Sensors are | Result shape |
|---|---|---|---|
sensor_points | a list of [x, y, z] in metres | exactly your points | {"output": [...], "min-legend": 0, "max-legend": 100} |
sensor_surfaces | {id: entity} of horizontal work planes | gridded onto each surface, analysis_height above it | {"surfaces": {id: {...}}} |
buildings | {id: {"barriers": ..., "openings": ..., "floors": [...]}} | per building, per storey | {"buildings": {id: {"floors": {...}}}} |
floors / floor_index / floor_uuid | a storey selector over top-level barriers | on the selected slab | {"floors": {...}}, or the bare floor object for a single legacy selector |
Glazing is per opening. openingFactor is the visible-light transmittance of one aperture, in [0, 1] — not a room-wide setting. Two identical windows on opposite walls at 0.9 and 0.1 give half-field means of 8.20 % and 3.51 %. Absent, it defaults to 1.0, a fully clear pane.
The worker reads the exact camelCase key openingFactor, with no fallback and no alias: opening_factor and other spellings are ignored, and the window silently becomes clear glass. The value multiplies the ray weight with no clamp, so openingFactor=7.5 returns a daylight factor above 100 % rather than an error. Set it via to_interior_entity(mesh, opening_factor=...), which emits the one spelling that is read; the SDK rejects near-misses and out-of-range values before submission. interior_entities(meshes, opening_factor=...) will not apply a bulk value over entities that already carry their own.
Caps. The SDK checks these client-side because the charge lands before the worker runs: every cap is a 422 raised inside the worker, so an over-cap request is billed and then refused, with nothing in the failure path reversing it.
| Limit | Value | Counted over |
|---|---|---|
| Floors per request | 15 | floors, sensor_surfaces, or summed across all buildings entries |
sensor_points | 100,000 | one request |
| Occluder triangles | 2,000,000 | barriers + openings + context_geometry + ground_geometry + vegetation + everything under buildings. sensor_surfaces are virtual and do not count — they are gridded into measurement points and never join the occluder. |
A complete run — a two-storey building with a window per storey, from geometry to numbers:
import os

from infrared_sdk import (
    AnalysesName,
    DaylightFactorModelRequest,
    InfraredClient,
    to_interior_entity,
)

client = InfraredClient(api_key=os.environ["INFRARED_API_KEY"])


def quad(p0, p1, p2, p3):
    """One flat quad as two triangles, in the SDK's usual flat mesh shape."""
    return {
        "coordinates": [c for p in (p0, p1, p2, p3) for c in p],
        "indices": [0, 1, 2, 0, 2, 3],
    }


W = D = 8.0           # room footprint, metres
H = 3.2               # storey height
STOREYS = [0.0, 3.2]  # slab elevations -> storey index 0 and 1

barriers = {}
openings = {}
for i, z in enumerate(STOREYS):
    # A slab MUST carry category="floor": storeys are clustered from
    # categorised slabs by elevation, and the storey index is that ranking.
    barriers[f"slab-{i}"] = to_interior_entity(
        quad((0, 0, z), (W, 0, z), (W, D, z), (0, D, z)), category="floor"
    )
    top = z + H
    barriers[f"ceiling-{i}"] = to_interior_entity(
        quad((0, 0, top), (W, 0, top), (W, D, top), (0, D, top))
    )
    barriers[f"wall-s-{i}"] = to_interior_entity(
        quad((0, 0, z), (W, 0, z), (W, 0, top), (0, 0, top))
    )
    barriers[f"wall-n-{i}"] = to_interior_entity(
        quad((0, D, z), (W, D, z), (W, D, top), (0, D, top))
    )
    barriers[f"wall-w-{i}"] = to_interior_entity(
        quad((0, 0, z), (0, D, z), (0, D, top), (0, 0, top))
    )
    barriers[f"wall-e-{i}"] = to_interior_entity(
        quad((W, 0, z), (W, D, z), (W, D, top), (W, 0, top))
    )
    # A 4 x 1.6 m window in the south wall, sill 0.9 m above the slab, nudged
    # just inside the wall plane so it is unambiguously an aperture in it.
    eps, sill = 0.01, z + 0.9
    openings[f"window-s-{i}"] = to_interior_entity(
        quad((2, eps, sill), (6, eps, sill), (6, eps, sill + 1.6), (2, eps, sill + 1.6)),
        opening_factor=0.7,
    )

request = DaylightFactorModelRequest(
    analysis_type=AnalysesName.daylight_factor,
    barriers=barriers,
    openings=openings,
    floors=[0, 1],        # both storeys; the lowest slab is index 0
    grid_size=0.5,        # sensor pitch on the working plane, metres
    analysis_height=0.8,  # sensors this far above the slab
)

job = client.analyses.execute(payload=request)
client.jobs.wait_for_completion(job.job_id, timeout=600)
raw = client.jobs.decompress(client.jobs.download_results(job.job_id).content)

for key, floor in raw["floors"].items():
    df = [p["df"] for p in floor["output"]]
    print(
        f"storey {key}: {len(df)} sensors  "
        f"min {min(df):.2f}%  mean {sum(df) / len(df):.2f}%  max {max(df):.2f}%"
    )
Reading the output. Each sensor is {"x", "y", "z", "df"} — position in the same metre frame you sent, and df as a percentage of outdoor illuminance. The fixed legend is 0–100. Values fall off steeply with distance from the aperture: on a 10 m × 10 m floor plate with one 3 m × 2 m window per storey, sensors run from 27.9 % directly at the window to 2.2 % at the back wall, mean 4.6 %. Expect a wider spread with more or larger glazing, and a much narrower one in a deep plan.
A flat field at the floor signals a stripped occluder rather than a real answer: a fully opaque envelope — windows discarded, or never read — returns 2.00 % everywhere, which reads as a dim room rather than as an error.
len(set(values)) > 1 is not a sufficient guard, because back-of-room values sit at 2.0–2.2 % whether or not the glazing was read. Check instead that the maximum clears the floor — max(values) > 2.5. A room whose best sensor is at the floor has no working aperture.
Neighbouring buildings shade the room through context_geometry. Omitting it does not error; the room simply reads brighter than it is, by a scene-dependent margin.
Model defaults, all overridable on the payload:
| Field | Default | Meaning |
|---|---|---|
grid_size | 0.5 | Sensor pitch, metres |
analysis_height | 0.8 | Working-plane height above the slab, metres |
window_area | 2.0 m² | Total glazed area, scalar or a list that is summed. Feeds the internally reflected component only — see below |
room_reflectances | {"floor": 0.2, "walls": 0.5, "ceiling": 0.7} | One set for the whole request, unlike openingFactor |
exterior_ground_reflectance | 0.2 | CIE overcast ground bounce |
use_obb | true | Grid the floor over its oriented bounding box rather than an axis-aligned one |
What the SDK refuses before submission. Each of these is something the server accepts, bills, and then either fails on or answers wrongly:
| You do this | What the server does | What the SDK does |
|---|---|---|
flat mesh in barriers / openings / context_geometry | skips the entity → empty occluder, 200, billed | rejects, naming the entity |
nested entity in ground_geometry / vegetation | 500-class failure, billed | rejects, names the flat shape |
room geometry in geometries | never read → uniform field | rejects, points at barriers |
buildings + top-level openings | drops the windows → fully opaque envelope, a plausible flat field near 2 % | rejects, explains the takeover |
buildings + top-level barriers | drops your barriers silently | rejects, explains the takeover |
| a selector the winning tier ignores | runs a different tier, silently | rejects, naming the tier that wins |
floors beside legacy floor_index / floor_uuid | floors wins, the legacy key is never read | rejects, tells you to fold or drop it |
non-horizontal sensor_surfaces | 422 after the charge | rejects locally |
an empty selector (sensor_points=[], buildings={}) | 422 from inside the dispatched tier, after the charge | rejects with the server's own message |
opening_factor (snake) instead of openingFactor | never read → glazing silently becomes 1.0 | rejects, gives the spelling |
openingFactor outside [0, 1] | no clamp → daylight factor above 100 % | rejects, bounds it |
| over any request-size cap | 422 after billing | rejects locally |
| non-finite, empty, or out-of-range mesh arrays | opaque 500, silent drop, or billed 500 | rejects locally |
A full walkthrough, including each failure mode above, is in cookbook/notebooks/13_interior_daylight_factor.ipynb in the infrared-skills repo.
Analysis Names Reference
| Enum Value | API Name |
|---|---|
AnalysesName.wind_speed | wind-speed |
AnalysesName.pedestrian_wind_comfort | pedestrian-wind-comfort |
AnalysesName.daylight_availability | daylight-availability |
AnalysesName.direct_sun_hours | direct-sun-hours |
AnalysesName.sky_view_factors | sky-view-factors |
AnalysesName.solar_radiation | solar-radiation |
AnalysesName.thermal_comfort_index | thermal-comfort-index |
AnalysesName.thermal_comfort_statistics | thermal-comfort-statistics |
AnalysesName.daylight_factor | daylight-factor |
Vegetation & Ground Materials
The SDK can fetch vegetation (trees) and ground material layers (asphalt, grass, water, etc.) for a polygon. Fetch them explicitly and pass to run_area_and_wait():
# Fetch vegetation (trees from OSM)
area_veg = client.vegetation.get_area(polygon)
print(f"{area_veg.total_trees} trees found")

# Fetch ground materials (Overture + road-surface FlatGeobuf)
area_gm = client.ground_materials.get_area(polygon)
print(f"{area_gm.total_features} features found")

# Pass to run_area_and_wait
result = client.run_area_and_wait(
    payload, polygon,
    buildings=area.buildings,
    vegetation=area_veg.features,
    ground_materials=area_gm.layers,
)
Fetch once and reuse across multiple analysis runs over the same polygon to avoid redundant API calls.
Layer parameter behaviour
The buildings, vegetation, and ground_materials parameters on run_area() / run_area_and_wait() are opt-in: nothing is auto-fetched.
| Value | Behavior |
|---|---|
None (default) or {} | Skip — no data of this type is injected into the simulation |
{...} (non-empty) | Use the provided data |
If you need vegetation or ground materials in a simulation, fetch them with the dedicated sub-clients (client.vegetation.get_area(), client.ground_materials.get_area()) and pass the result. Wind / SVF analyses generally don't need them; thermal and solar analyses produce more realistic results when they are included.
Format
| Field | Format | Coordinate frame |
|---|---|---|
buildings | DotBim meshes (coordinates flat XYZ list, indices face triplets) | polygon-bbox-SW meters; SDK transforms to tile-SW per tile |
vegetation | GeoJSON Feature dict keyed by OSM id; each Feature has geometry.coordinates = [lon, lat] and OSM tree properties | lon/lat — the inference layer handles projection and any geometry conversion |
ground_materials | Dict of GeoJSON FeatureCollection keyed by material name (asphalt, concrete, vegetation, water, soil) — not UUIDs | lon/lat — projected server-side |
Area API
For multi-tile analyses over large polygons, the area API handles tiling, building assignment, and result merging automatically.
Cost preview
Before running an area analysis, preview how many tiles it will require. Always pass analysis_type so the preview uses the correct tile grid for the analysis you intend to run:
# Solar / daylight / thermal-comfort analyses (512 m grid, edge-to-edge)
preview = client.preview_area(polygon, analysis_type="solar-radiation")

# Wind analyses (256 m grid, 50% overlap)
preview = client.preview_area(polygon, analysis_type="wind-speed")

print(f"Tiles: {preview.tile_count}")
print(f"Estimated time: {preview.estimated_time_s}s")
print(f"Estimated cost: {preview.estimated_cost_tokens} tokens")The returned estimated_time_s and estimated_cost_tokens are per analysis at the chosen grid. For a multi-analysis workflow on the same grid family, multiply by the number of analyses.
| Field | Type | Description |
|---|---|---|
tile_count | int | Non-empty tiles for analysis_type's grid |
estimated_time_s | float | Per-analysis wall-clock time (tile_count*10) |
estimated_cost_tokens | int | Per-analysis token cost (tile_count*10) |
Wire-format analysis names accepted (kebab-case): "wind-speed", "pedestrian-wind-comfort", "solar-radiation", "direct-sun-hours", "daylight-availability", "sky-view-factors", "thermal-comfort-index", "thermal-comfort-statistics".
Basic usage
from infrared_sdk import InfraredClient
from infrared_sdk.analyses.types import WindModelRequest, AnalysesName

polygon = {
    "type": "Polygon",
    "coordinates": [[
        [13.4050, 52.5200],
        [13.4110, 52.5200],
        [13.4110, 52.5254],
        [13.4050, 52.5254],
        [13.4050, 52.5200],
    ]],
}

with InfraredClient() as client:
    # Fetch buildings once
    area = client.buildings.get_area(polygon)

    # Run analysis — buildings are reused
    wind_result = client.run_area_and_wait(
        WindModelRequest(
            analysis_type=AnalysesName.wind_speed,
            wind_speed=10, wind_direction=180,
        ),
        polygon,
        buildings=area.buildings,
    )

    print(wind_result.grid_shape)      # e.g. (768, 1024)
    print(wind_result.succeeded_jobs)  # number of tiles that completed
Multi-analysis runs
Run several analysis types over the same polygon in a single parallel batch by passing a list of payloads. All tile submissions across all analysis types are pooled into one shared thread pool, so tiles from different analysis types can be in flight simultaneously:
results = client.run_area_and_wait(
    [wind_payload, svf_payload, solar_payload],
    polygon,
    buildings=area.buildings,
)

# Results are returned as a list in the same order as the input payloads
wind_result = results[0]
svf_result  = results[1]
solar_result = results[2]
The same applies to parameter sweeps of one analysis type — passing a list of payloads with different config (e.g. 8 wind directions) submits all 8 × tile_count jobs through a single shared 20-worker pool rather than running 8 sequential per-direction batches.
Concurrency at scale
- Per-call cap: the SDK caps in-flight submissions at
max_workers(default 20) regardless of how many payloads × tiles you pass. Sorun_area_and_wait([8 payloads], polygon)with 24 tiles per payload still uses 20 concurrent submissions, not 192. Themax_workersargument tunes this per call. - Multi-user / multi-process: each
InfraredClientinstance has its own pool. To go above 20 simultaneous submissions, instantiate multiple clients in separate threads or processes — the API is designed to handle parallel callers. - Cold start: the first request in a session typically takes 2–5× longer than subsequent ones (Lambda cold start). Benchmark numbers from warm runs are not representative of first-call latency.
- Backend limits: the API enforces an account-level concurrency ceiling on simulation execution. Contact support if you regularly need to exceed ~100 simultaneous tile jobs.
Webhooks with multi-payload batches
When webhook_url is set on a multi-payload run, your endpoint will receive up to payloads × tiles events in a tight time window — much denser than per-payload sequential submission. Make sure your endpoint can handle the burst (queue ingestion / batch DB writes recommended).
Polygon requirements
- GeoJSON Polygon format:
{"type": "Polygon", "coordinates": [[[lon, lat], ...]]} - Coordinate order:
[longitude, latitude](GeoJSON standard) - Single ring, closed, at least 3 unique vertices, no self-intersections
- Max ~100 non-empty tiles (override with
max_tiles_override)
How tiling works
The Infrared API simulates a fixed 512×512 m tile at a time. To analyse a polygon larger than one tile, the SDK splits it into a grid of overlapping tiles, runs each one in parallel, then crops and stitches the results into a single merged grid.
Tile geometry
Every tile has three key dimensions:
| Parameter | Description |
|---|---|
| Inference size (512 m) | The area actually simulated by the API. Always 512×512 m, producing a 512×512 cell grid (1 m per cell). |
| Context size | The area used to select which buildings are sent with the tile. May be larger than the inference size so buildings outside the tile that cast shadows or affect wind can be included. |
| Step size | The distance between adjacent tile centres. Controls how much tiles overlap. |
These parameters differ between wind and solar model groups:
| Config | Inference | Context | Step | Overlap | Crop |
|---|---|---|---|---|---|
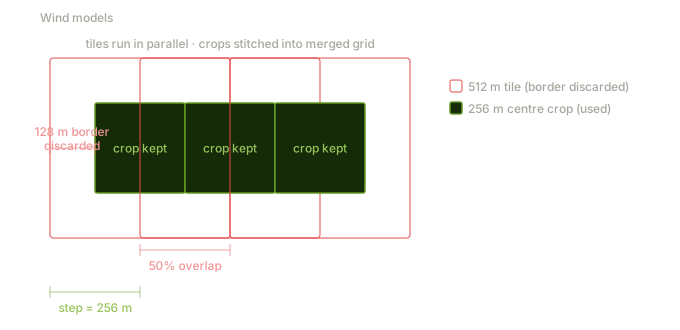
Wind (wind-speed, pedestrian-wind-comfort) | 512 m | 512 m | 256 m | 50% (256 m) | Centre 256×256 cells |
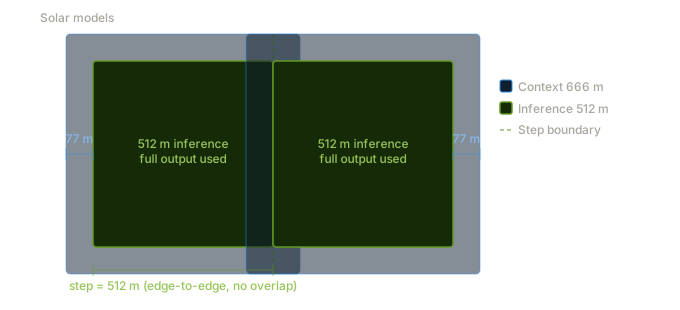
| Solar (all other types) | 512 m | 768 m | 512 m | None (edge-to-edge) | Full 512×512 cells |
Why the difference? Wind effects propagate laterally — a building's wind shadow extends far downwind. Dense 50% overlap with centre-cropping ensures each point in the merged grid comes from the most accurate central region of a tile. Solar/daylight analyses need long shadows from distant buildings (hence the wider 768 m context, adding 128 m on each side) but the output itself doesn't benefit from overlap, so tiles are placed edge-to-edge.
Merging
After all tiles complete, the SDK extracts a centre crop from each tile's 512×512 result:
- Wind: crops the inner 256×256 cells (discards the 128-cell border on each side), then places each crop at its grid position. Adjacent crops meet exactly — no blending needed because each point was computed from the tile where it's most central.
- Solar: uses the full 512×512 result (no crop), placed edge-to-edge.
Cells outside the input polygon are set to NaN via cell-level point-in-polygon clipping.
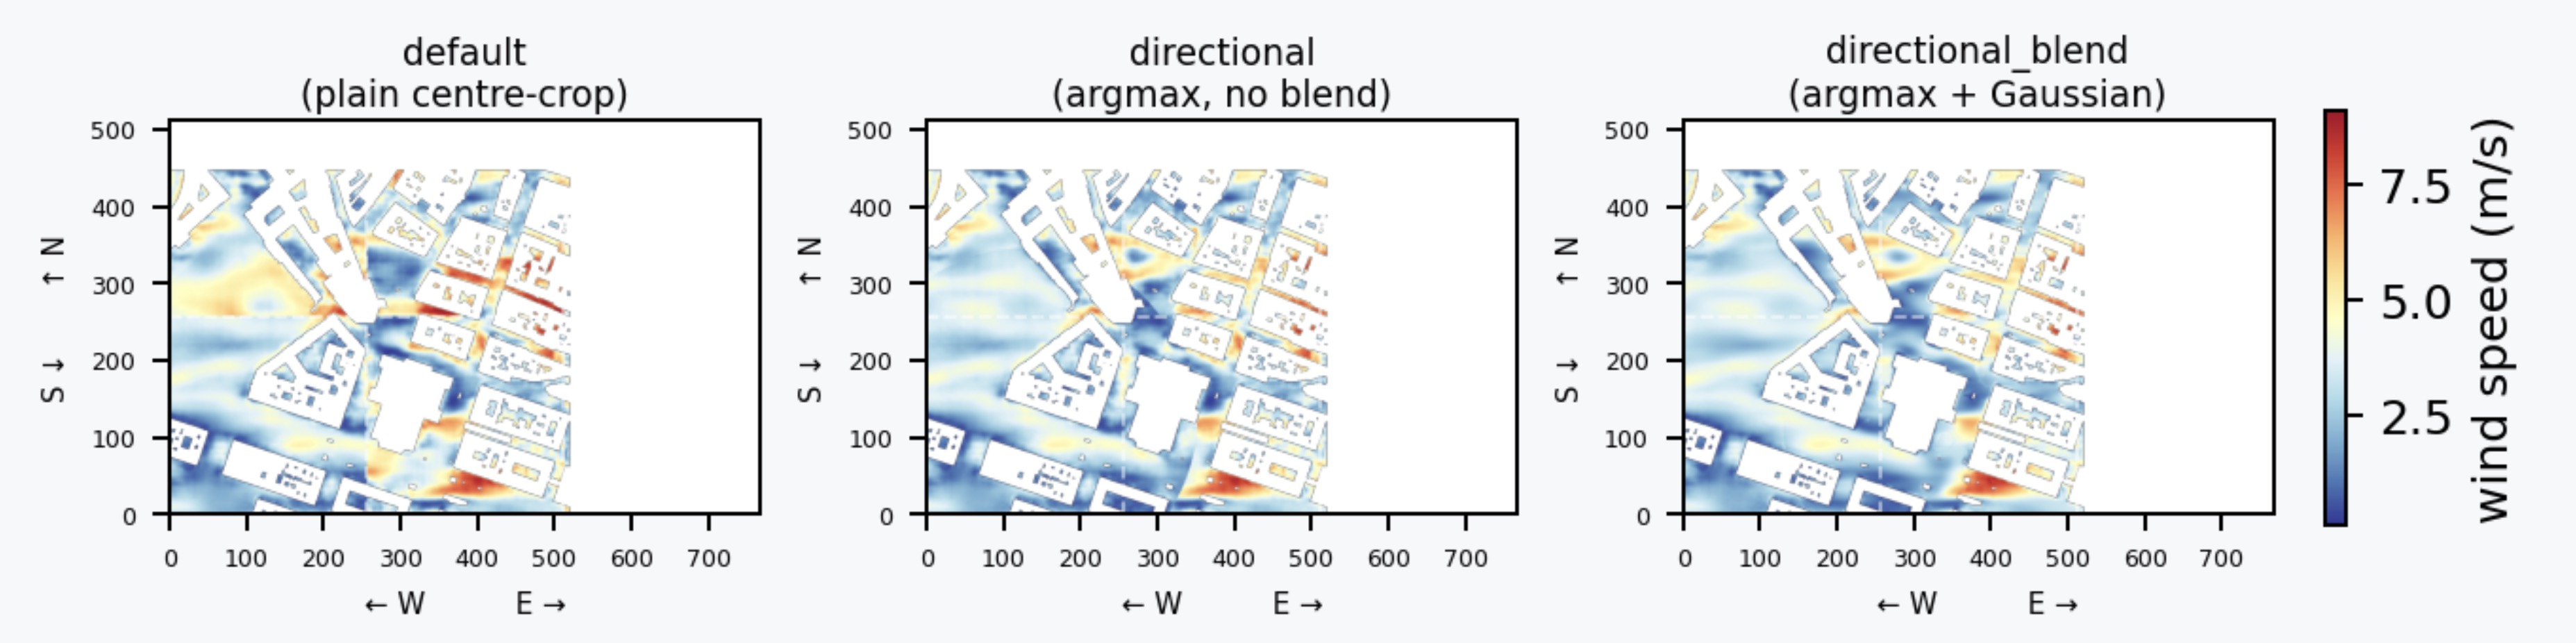
Optional: directional merge strategies (wind-speed only)
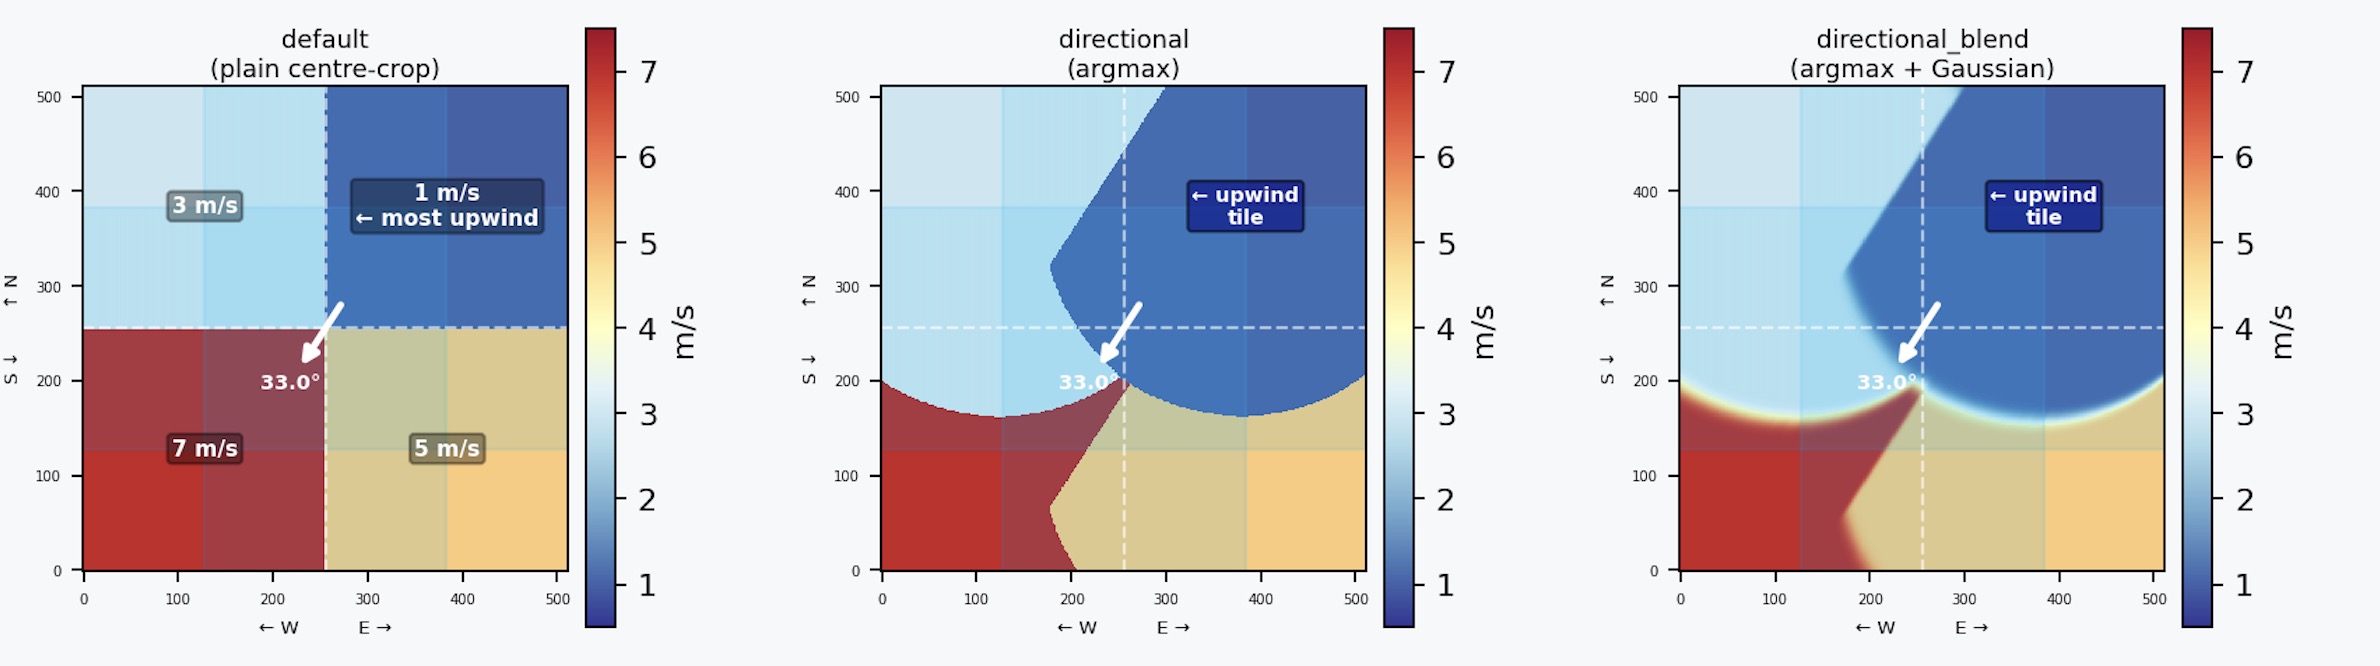
By default merge_area_jobs uses the plain centre-crop merge described above (strategy="default"). For wind-speed analyses two directional strategies are available:
| Strategy | Description |
|---|---|
"default" | Plain centre-crop (no direction needed). |
"directional" | Directional argmax without blending. Each cell is won by the tile with the most upwind geometry context. Useful to inspect the winner map or when blending is undesirable. Requires wind_direction_deg. |
"directional_blend" | S12a full smart-blend — argmax + upstream-biased Gaussian. Produces visually smoother results across tile seams. Requires wind_direction_deg. |
# Argmax only — winner map, no smoothing
result = client.merge_area_jobs(
    schedule,
    strategy="directional",
    wind_direction_deg=270.0,   # meteorological: wind FROM west
)

# Full smart-blend — argmax + upstream-biased Gaussian
result = client.merge_area_jobs(
    schedule,
    strategy="directional_blend",
    wind_direction_deg=270.0,
)

# Reduce memory footprint for large polygons (strategy="default" only)
import numpy as np
result = client.merge_area_jobs(schedule, dtype=np.float32)In the overlap between two tiles, the tile that was upwind during simulation saw that area with full context behind it, so its numbers are more trustworthy. Both strategies pick the upwind tile's values there — "directional" with a hard switch, "directional_blend" with a weight that fades gradually — which shrinks seam artefacts to near zero without post-processing. This matters most when running extra tiles for higher coverage, custom non-uniform grids, or targeted re-sampling of a specific zone.
Building coordinate transforms
This is the most important piece to understand when working with the area API:
client.buildings.get_area(polygon)fetches buildings from multiple tiles, deduplicates them, and transforms all coordinates into the polygon bounding-box SW frame — the south-west corner of the polygon's bounding box is origin(0, 0), x points east, y points north, values in meters.
- When you pass
buildingstorun_area_and_wait(), the SDK must assign each building to the tile(s) it overlaps. For each tile, the SDK:- Computes the tile's inference SW offset relative to the polygon bbox SW (based on the tile's row/col and the step size)
- Expands the tile's bounding box by the context margin (0 m for wind, 128 m for solar) — this expanded area is only used to select which buildings to include
- Tests each building's bounding box against this expanded context area
- Deep-copies the building and subtracts the inference tile's SW offset from its coordinates, converting from polygon-bbox-SW frame to tile-SW frame
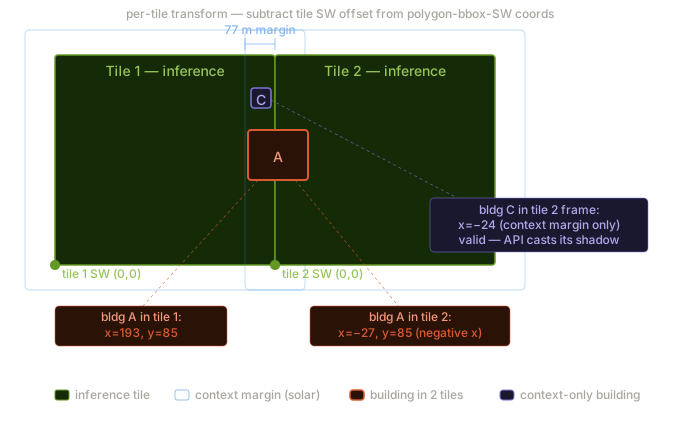
This means the same building can appear in multiple adjacent tiles (with different coordinates in each), which is correct — the API expects buildings in the tile's local coordinate frame.
If you provide your own buildings to run_area_and_wait(), they must be in the polygon-bbox-SW frame. The SDK handles the per-tile transform automatically. Buildings returned by client.buildings.get_area() are already in this frame.
Other details
- Parallelism: Up to 20 concurrent API calls per run (configurable via
max_workers) - Retry: 2 retries with exponential backoff + jitter for HTTP 429/5xx
- Single-tile bypass: If the polygon fits in one tile, tiling overhead is skipped
- Projection: Local tangent plane approximation, accurate for city-scale polygons (<50 km span)
AreaResult
| Field | Type | Description |
|---|---|---|
merged_grid | numpy.ndarray | Merged, clipped grid (NaN outside polygon) |
polygon | dict | The source GeoJSON polygon |
analysis_type | str | Which analysis type was run |
grid_shape | tuple[int, int] | (rows, cols) of merged grid |
failed_jobs | list[str] | Job IDs that failed |
skipped_jobs | list[str] | Job IDs that were skipped (download error, etc.) |
total_jobs | int | Total number of jobs submitted |
succeeded_jobs | int | Number of jobs that succeeded |
failed_tiles | list[TileFailure] | Per-tile failure records (tile_id, row, col, error, phase), classified by TileFailurePhase (submit / compute / download / skipped) — the structured answer to "which tiles produced no usable output". Empty when every tile succeeded. |
min_legend | float or None | Minimum legend value across all tile results. None on area runs — declared, but not populated by the grid path. Use a fixed per-analysis domain instead. |
max_legend | float or None | Maximum legend value across all tile results. None on area runs, as above. Populated only on SurfaceAnalysisResult. |
bounds | tuple[float, float, float, float] or None | Geographic extent of merged_grid as (min_lng, min_lat, max_lng, max_lat). Padded NE past polygon.bounds to the next step_m boundary when the polygon side is not an integer multiple of step_m. Use this (not polygon.bounds) to place the bitmap in a map viewer — otherwise you get an SW-anchored squash. None when no grid was produced (empty schedule). |
Serialize for JSON: result.to_dict() (converts the numpy grid to nested lists with NaN replaced by None).
Image Generation
Generate a PNG image from analysis results:
result = client.run_area_and_wait(payload, polygon, buildings=area.buildings)
grid = result.merged_grid.tolist()

img_bytes = client.weather.gen_grid_image(
    grid=grid,
    analysis_type="wind-speed",  # optional: improves color mapping
)

with open("output.png", "wb") as f:
    f.write(img_bytes)
gen_grid_image also accepts optional criteria and subtype parameters for PWC and TCS analyses.
Async Jobs & Webhooks
The SDK supports two execution styles for analyses: synchronous polling — run_area_and_wait() blocks until results are ready — and asynchronous submission — run_area() returns immediately with an AreaSchedule, the API processes jobs in the background, and your service is notified through webhooks (or by manual polling). Pick the style that matches how your code waits for the result.
Prefer async + webhooks when:
- Long-running, large-area runs where blocking a process for minutes is impractical.
- Headless / serverless / batch jobs where there is no caller to keep open.
- Multi-analysis or parameter-sweep batches that submit many tiles at once.
- Multi-user or fan-out backends where many polygons are scheduled concurrently and a single webhook stream consolidates completions.
Prefer synchronous polling (run_area_and_wait) when:
- Notebooks or interactive scripts where the result is consumed inline.
- Small polygons or single-tile runs that complete in seconds.
- Local development and debugging — no public webhook endpoint required.
- Environments without a routable webhook URL (corporate networks, ad-hoc machines).
Single-tile primitives
For direct control over a single job — custom polling, replaying jobs from your own queue, or wiring webhooks at the analysis level — use the low-level primitives client.analyses.execute() and client.jobs.*. Most users should reach for run_area() / run_area_and_wait() instead; these primitives exist for advanced workflows.
from infrared_sdk import InfraredClient, WEBHOOK_EVENT_SUCCEEDED, WEBHOOK_EVENT_FAILED
from infrared_sdk.analyses.jobs import JobStatus

with InfraredClient() as client:
    # 1. Submit (returns immediately)
    job = client.analyses.execute(
        payload=payload,
        webhook_url="https://your-server.com/webhooks",
        webhook_events=[WEBHOOK_EVENT_SUCCEEDED, WEBHOOK_EVENT_FAILED],
    )
    print(job.job_id, job.status)  # e.g. "abc-123", JobStatus.pending

    # 2a. Either poll manually...
    snapshot = client.jobs.get_status(job.job_id)
    if snapshot.status == JobStatus.succeeded:
        download = client.jobs.download_results(job.job_id)

    # 2b. ...or block on a convenience wrapper (returns when terminal)
    completed = client.jobs.wait_for_completion(job.job_id, timeout=300)

    # 2c. ...or skip polling entirely and react to the webhook delivery instead.

    # 3. Download results once the job has Succeeded
    download = client.jobs.download_results(completed.job_id)
JobStatus is a string enum returned by client.jobs.get_status() and exposed on the Job dataclass. The five values are:
| Field | Type | Description |
|---|---|---|
pending | str | Job has been accepted by the API and is queued for execution. |
running | str | Job is currently being processed by the inference backend. |
succeeded | str | Terminal — results are ready to download via client.jobs.download_results(). |
failed | str | Terminal — the job did not produce a result; inspect job.error for details. |
unknown | str | Status string was not recognised (forward-compat fallback). Treat as non-terminal. |
Async area runs with run_area
client.run_area() is the async counterpart to run_area_and_wait(). It performs the same tiling, building assignment, and submission, but returns an AreaSchedule describing the in-flight jobs without blocking on completion.
from infrared_sdk import InfraredClient, WEBHOOK_EVENT_SUCCEEDED, WEBHOOK_EVENT_FAILED

with InfraredClient() as client:
    area = client.buildings.get_area(polygon)

    schedule = client.run_area(
        payload,
        polygon,
        buildings=area.buildings,
        webhook_url="https://your-server.com/webhooks",
        webhook_events=[WEBHOOK_EVENT_SUCCEEDED, WEBHOOK_EVENT_FAILED],
    )

    print(f"Submitted {len(schedule.jobs)} tile jobs ({len(schedule.failed_submissions)} submission errors)")

    # ... your webhook receiver records each job.succeeded / job.failed event ...

    # Once all jobs are terminal, download and merge into a single AreaResult
    result = client.merge_area_jobs(schedule)
AreaSchedule schema:
| Field | Type | Description |
|---|---|---|
jobs | dict[str, str] | Mapping of tile_id to the submitted job_id. |
polygon | dict | The source GeoJSON polygon (used by merge_area_jobs to clip). |
analysis_type | str | Which analysis type was submitted. |
failed_submissions | tuple[str, ...] | Tile IDs whose submission HTTP call failed; passed to retry_from=. |
submission_abort_status | int or None | HTTP status code that caused early abort during submission (e.g. 402 for insufficient credits). None when all submissions completed or failed only transiently. Check before retrying — a 402 means the account hit its credit limit; resubmitting immediately reproduces the abort. |
webhook_url | str or None | Webhook URL the schedule was submitted with (preserved for retries). |
webhook_events | tuple[str, ...] or None | Webhook events the schedule subscribed to. |
run_area accepts a list of payloads (multi-analysis or parameter sweeps) and returns list[AreaSchedule] — one per payload — sharing a single thread pool. See Webhooks with multi-payload batches above for the burst-rate caveat that applies when these schedules deliver events to the same endpoint.
Persistence and retry. AreaSchedule.to_dict() and AreaSchedule.from_dict() round-trip JSON-safely, so a schedule can be persisted (database, file, queue message) between submission and merge. To retry only the tiles/batches that failed, pass the original schedule back via retry_from=: client.run_area(payload, polygon, retry_from=prior_schedule) resubmits just the failed keys and, from 0.4.13, carries the previously-succeeded jobs forward into the returned schedule. Merge that schedule directly — no manual prior_schedule.merge(retry_schedule) step.
The retry payload must match the original run, or run_area raises ValueError before submitting: (a) a different payload config (config_hash mismatch), (b) a different buildings/geometries map than the one that produced the schedule (buildings_hash guard), or (c) a multi-payload list — retry_from describes one payload's prior run, so retry each payload separately (run_area(B, polygon, retry_from=schedule_B)).
Manual polling. When a webhook endpoint is not available, client.check_area_state(schedule) queries every job status in parallel and returns an AreaState (counts of pending/running/succeeded/failed and an is_complete flag) suitable for a polling loop.
Submission retries. Tile submissions retry HTTP 429 / 5xx with exponential backoff and jitter (max_retries=2); see the note under Area API → Other details.
run_area_and_wait also accepts webhook_url=. Passing webhook_url= (and optionally webhook_events=) to run_area_and_wait() does not change its blocking behaviour — the call still returns the merged AreaResult locally — but it also asks the API to deliver per-job lifecycle events to your endpoint. Use this when you want the convenience of a synchronous result inside a script while still streaming job-level signals into a backend (queue, database, monitoring).
Webhooks
Webhook endpoints are the back-channel the API uses to signal job lifecycle changes. Endpoints are registered once per environment via client.webhooks.*; per-job subscriptions are attached at submit time using webhook_url= / webhook_events=.
from infrared_sdk import InfraredClient
from infrared_sdk import WEBHOOK_EVENT_SUCCEEDED, WEBHOOK_EVENT_FAILED

with InfraredClient() as client:
    # Register an endpoint
    endpoint = client.webhooks.register(
        url="https://your-server.com/webhooks",
        type="production",
    )
    print(f"Endpoint ID: {endpoint.id}")

    # List all registered endpoints
    endpoints = client.webhooks.list()

    # Delete an endpoint when no longer needed
    client.webhooks.delete(endpoint.id)
The type argument selects the server-side environment (and signing-secret pair) that an endpoint is bound to: "production" for production traffic, "development" for development / staging traffic. The SDK forwards type to the API verbatim; it does not change client behaviour.
The signing secret for a registered endpoint is available in your account dashboard at platform.infrared.city after registration. Treat the secret like an API key: store it server-side and pass it directly to verify_signature().
Webhook events. When you submit a job, pass the events you want delivered as the raw event-name strings on the wire:
job.running— job has started processing.job.succeeded— job completed successfully (results available viaclient.jobs.download_results).job.failed— job failed (the event payload includes the error reason).
In Python code, prefer the SDK constants WEBHOOK_EVENT_RUNNING, WEBHOOK_EVENT_SUCCEEDED, WEBHOOK_EVENT_FAILED (re-exported from infrared_sdk) instead of typing the strings.
Signature verification. Every delivery is signed with the Standard Webhooks v1 HMAC-SHA256 scheme. The webhook-id, webhook-timestamp, and webhook-signature headers carry the message id, signing timestamp, and HMAC respectively. tolerance (default 300 s) bounds how old a timestamp may be before the call is rejected as a replay. Always verify against the raw request body bytes — verifying against parsed JSON or a re-encoded string changes byte-level whitespace and breaks the HMAC. This is the most common cause of webhook verification failures. verify_signature() accepts secrets with the whsec_ prefix as stored in the dashboard; the prefix is stripped internally before HMAC computation.
from infrared_sdk import WebhooksServiceClient

is_valid = WebhooksServiceClient.verify_signature(
    payload_body=request_body,    # raw bytes from the HTTP request body
    headers=request_headers,
    secret="whsec_...",            # signing secret from the dashboard
    tolerance=300,                 # seconds — replay-attack window
)
Pre-flight Diagnostics
At low sun angles, building shadows can extend beyond the per-tile geometry buffer and silently lose context near tile edges. The pre-flight check (estimate_sun_context_loss) flags those configurations before you run.
Error Handling
Payload validation: The SDK validates all payloads at construction time using Pydantic. Invalid inputs raise ValidationError immediately:
from pydantic import ValidationError

try:
    payload = WindModelRequest(
        analysis_type=AnalysesName.wind_speed,
        wind_speed=200,  # exceeds max of 100
        wind_direction=180,
    )
except ValidationError as e:
    print(e)  # field validation errors
HTTP errors: The SDK automatically retries HTTP 429 (rate-limited) and 5xx (server error) responses with exponential backoff and jitter. Non-retryable errors (401, 403) raise immediately.
Job-level errors: All job exceptions inherit from InfraredJobError:
| Exception | When |
|---|---|
JobSubmitError | Job submission failed |
JobPollError | Error while polling status |
JobFailedError | Job completed with failed status |
JobTimeoutError | Polling timed out |
JobNotCompletedError | Results requested for a job that hasn't completed |
ResultsDownloadError | Failed to download results |
Area-level errors: raised by the area orchestration path (run_area_and_wait, merge_area_jobs, buildings.get_area). They do not inherit from InfraredJobError — catch them separately:
| Exception | When |
|---|---|
AreaRunError | Every job in the run failed (server error, download permanently failed, or per-tile grid rejected). Carries failed_jobs, skipped_jobs, total_jobs. |
AreaTimeoutError | run_area_and_wait exceeded its area_timeout. Carries the live area_state snapshot so callers can decide whether to keep polling. |
TiledRunError | client.buildings.get_area(...) (or other tiled fetchers) had every tile fail after retries. Carries failed_tiles. Partial failures don't raise — inspect area.failed_tiles on the returned AreaBuildings instead. |
PolygonValidationError | The GeoJSON polygon is malformed — wrong coordinate order, unclosed ring, self-intersection, or too few vertices. Raised client-side by run_area / run_area_and_wait before any request. Subclasses ValueError. |
from infrared_sdk import AreaRunError  # importable from the top-level package

try:
    result = client.run_area_and_wait(payload, polygon, buildings=area.buildings)
except AreaRunError as exc:
    # Every job failed — log per-job state and either retry or fail loudly.
    print(f"All {exc.total_jobs} jobs failed: {exc.failed_jobs}, skipped: {exc.skipped_jobs}")
    raise
Big-payload errors: when a POST body exceeds INFRARED_BIG_PAYLOADS_THRESHOLD_BYTES (default 5 MiB), the SDK transparently zips the payload, uploads it to S3 via a presigned URL, and POSTs a {"$ref": ...} envelope at the original endpoint. Failures in any of those steps surface as the typed exceptions below — distinct from the per-service *ServiceError classes because they signal infrastructure failures (presign, S3 PUT, ref fetch) rather than domain-level API errors:
| Exception | When |
|---|---|
BigPayloadError | Common base. Catch this to handle every big-payload infrastructure error in one block. |
BigPayloadPresignError | Gateway refused the presign call (network failure, timeout, non-2xx, body not JSON, missing upload-url / get-url). Carries status_code + response_body. |
BigPayloadUploadError | S3 PUT failed (SignatureDoesNotMatch from a byte-count / Content-Type drift, transient 5xx exhausted, or transport error after retries). Carries status_code + response_body. |
BigPayloadFetchError | Final envelope POST returned a structured REF_* error other than REF_EXPIRED (REF_INVALID_ENVELOPE, REF_NOT_FOUND, REF_TOO_LARGE, REF_HOST_NOT_ALLOWED, REF_CONTENT_TYPE_REJECTED, REF_FETCH_TIMEOUT, REF_DECODE_FAILED). Dispatch on .code — any server-supplied REF_* code passes through, so treat the set as open. |
RefExpiredRetryExhausted | BigPayloadFetchError subclass. Raised after the bounded REF_EXPIRED retry budget (2 retries) has been consumed without success. Always carries code == "REF_EXPIRED". |
from infrared_sdk import BigPayloadError, BigPayloadFetchError, RefExpiredRetryExhausted

try:
    area_gm = client.ground_materials.get_area(large_polygon)
except RefExpiredRetryExhausted:
    # Presigned GET URL expired before the consumer could fetch it,
    # twice in a row. Retry the call.
    ...
except BigPayloadFetchError as exc:
    # Dispatch on the structured REF_* code rather than parsing the message.
    if exc.code == "REF_TOO_LARGE":
        # Pre-filter or aggregate features before retrying.
        ...
    else:
        raise
except BigPayloadError:
    # Presign or S3 PUT failed — infrastructure issue.
raiseCookbook and examples
Notebooks, agent skills (Claude Code / Cursor / Codex / Copilot / Windsurf), and runnable Python recipes live in Infrared-city/infrared-skills — start at cookbook/notebooks/. Each notebook is self-contained and ordered as a learning path:
| Notebook | Topic |
|---|---|
00_quickstart.ipynb | Install, env, instantiate the client, run one analysis end-to-end |
01_buildings.ipynb | client.buildings.get_area, DotBim mesh format, building heights |
02_vegetation_and_ground.ipynb | client.vegetation, client.ground_materials, layer formats |
03_weather_and_time_periods.ipynb | Weather file lookup, filter_weather_data, TimePeriod semantics |
04_tiling_and_area_api.ipynb | preview_area, rectangular vs. irregular polygons, tile geometry, AreaResult |
05_analysis_types_tour.ipynb | All 8 analysis types with payload patterns and outputs |
06_image_rendering.ipynb | gen_grid_image, orientation, colormap caveats |
07_async_and_webhooks.ipynb | run_area, check_area_state, merge_area_jobs, webhooks |
08_wind_merge_strategies.ipynb | Wind-speed merge strategies (default / directional / directional_blend), seam-zone inspection |
09_error_handling_and_tuning.ipynb | estimate_sun_context_loss pre-flight, big-payload $ref envelope errors, Retry-After, tuning |
10_real_world_map_overlay.ipynb | Overlay a result on an interactive OSM basemap using AreaResult.bounds |
11_facade_and_terrain.ipynb | analysis_surfaces (facades / roofs), ground_geometry terrain, SurfaceAnalysisResult |
12_surface_results_rendering.ipynb | Rendering surface grids: texture route, exact cell_tris mesh, whole-tile on one shared scale |
The cookbook/notebooks/advanced-api/ folder goes deeper per analysis (advanced solar / daylight / DSH / SVF / UTCI) and covers terrain, context-geometry occluders, and a realistic combined urban scenario.
License
Apache-2.0. Full text: https://www.apache.org/licenses/LICENSE-2.0.